
This past weekend we celebrated my Mom’s bday AND my cousin Beth had the sweetest little baby boy (named FINN – Finn- OMG – dead). So naturally, we had to celebrate life the best way we know how – with Grammy Murphy’s Whoopie Pies. But instead of making them the ole’ fashioned way, I widdled them into a Chocolate Covered Salted Caramel Whoopie Pie Cake – Yep.
I’ve done this crazy thing a couple times now sheerly based on laziness and lack of time. Instead of making a bunch of individual whoopies I make one GIANT whoopie – and smother it in chocolate ganache. And this time guys, I went deeper into the crazy and slathered salted caramel on it to bring this Chocolate Covered Salted Caramel Whoopie Pie Cake into the world.
Sweet. Baby. Jesus.
Have you guys ever made caramel from scratch before? Have you ever melted sugar before? Did you know that when you melt sugar it turns to liquid? When Sally told me that you just keep stirring it and eventually it will form this rich amber liquid gold, I thought she was straight up cray. But she’s not. She is a GENIUS. Then you add butter. And heavy cream. And at that moment in time, you can die happy, but not before sticking a straw in that caramel and drinking it like it’s the last drop of water on earth.
There may be some steps involved in this beauty, but when she’s done, she’s well worth the wait. And you’ll wonder how you ever lived your life without her. (Too deep for dessert? Meh – pass me the whoopie).
- 6 tablespoons shortening
- 1 cup sugar
- 1 egg
- 1 cup milk
- 2 cups flour
- 6 tablespoons unsweetened cocoa powder
- 1.5 teaspoons baking soda
- 1 teaspoon salt
- 1 teaspoon vanilla
- 1 & 1/2 cups shortening
- 3 cups powdered sugar
- 1 & 1/3 cups marshmallow topping (Fluffenutter works great)
- Dash of salt
- 1/3 to 1/2 cup of milk
- 1 cup granulated sugar
- 6 Tablespoons salted butter, cut up into 6 pieces
- 1/2 cup heavy cream
- 1 teaspoon salt
- 8oz dark chocolate
- 1/2 cup plus 2 tablespoons (10 tablespoons total) heavy cream
- Preheat oven to 350 degrees F.
- Place all of the ingredients for the whoopie pies In the bowl of a stand mixer fitted wtih the paddle attachment. Mix on medium speed until everything is fully combined. You may have to stop mid-way through and fold the ingredients with a spatula a couple of times and then continue to mix until fully combined.
- Spray 2 8-inch round cake pans with cooking spray. Split the mixture in half placing half in one pan and half in the other. Tap lightly to even out mixture.
- Bake in preheated oven for 18-20 minutes until a toothpick inserted in the center comes out clean.
- While your cake is baking, you can prepare your filling by combining all ingredients for filling in the bowl of a stand mixer, except for the milk, and mix on low-medium speed until a stiff filling begins to form. Add the milk slowly, a little at a time, until the filling reaches your desired texture. It should be fairly firm. Set it aside.
- After your filling is ready, you can prepare your salted caramel by heating your granulated sugar in a medium saucepan over medium heat, stirring frequently, and keeping a close eye on it so it doesn't burn. After about 10-15 minutes, the sugar will start to form into clumps and eventually turn into a brown, thick liquid. It's important to keep stirring so it doesn't burn.
- Once sugar is completely melted add the butter one cube at a time, stirring it into the melted sugar until it's completely combined. Caramel will bubble as you add the butter so be careful not to burn yourself!
- Slowly whisk the heavy cream into the sugar/butter mixture, continuing to stir. Again, be careful as the mixture will start to bubble again. After the cream is combined into the sugar/butter mix, let it boil for one minute. After 1 minute, remove from heat and add in the tablespoon of salt. Let this mixture cool for about 10-15 minutes.
- After your chocolate cake layer is cool, take a serrated knife to slice the top edge off of each layer. You want them to be flat on the top vs. that subtle round top that happens when they bake.
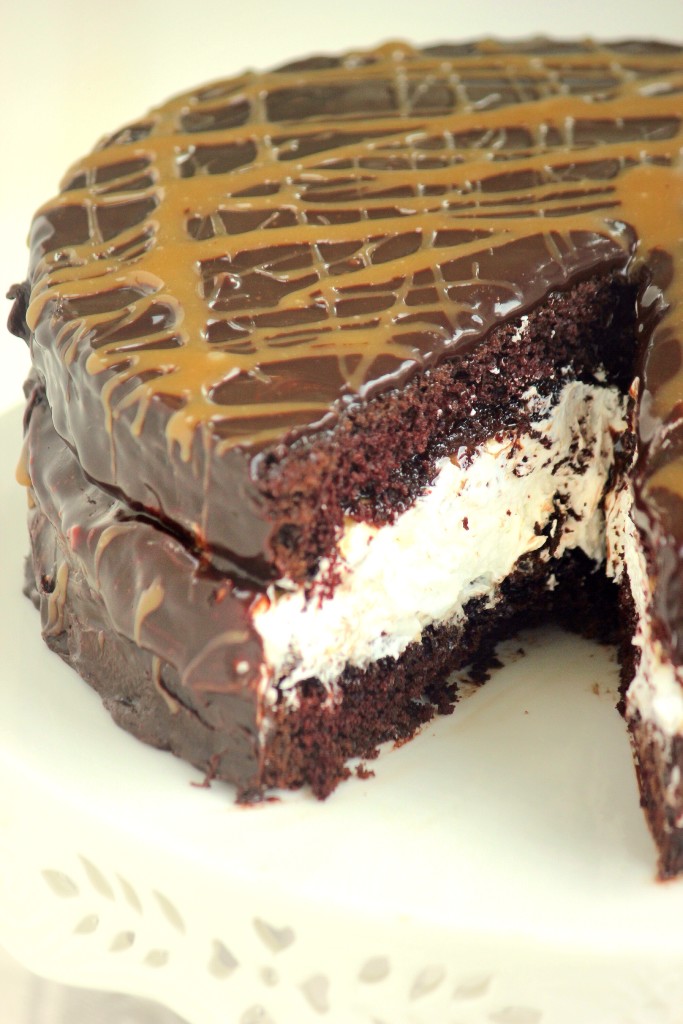
- Split the salted caramel into 3 parts. Spread 1/3 on each of the chocolate cake rounds, spreading it out to reach the edge.
- Then, gently spread your filling over the salted caramel of one of the cake rounds. Spread gently, trying not to mix in the salted caramel with the filling. Then, take the other cake round with the salted caramel and flip it over so that the salted caramel layer is touching the filling, and the chocolate is facing the top (so the layers go cake/caramel/filling/caramel/cake).
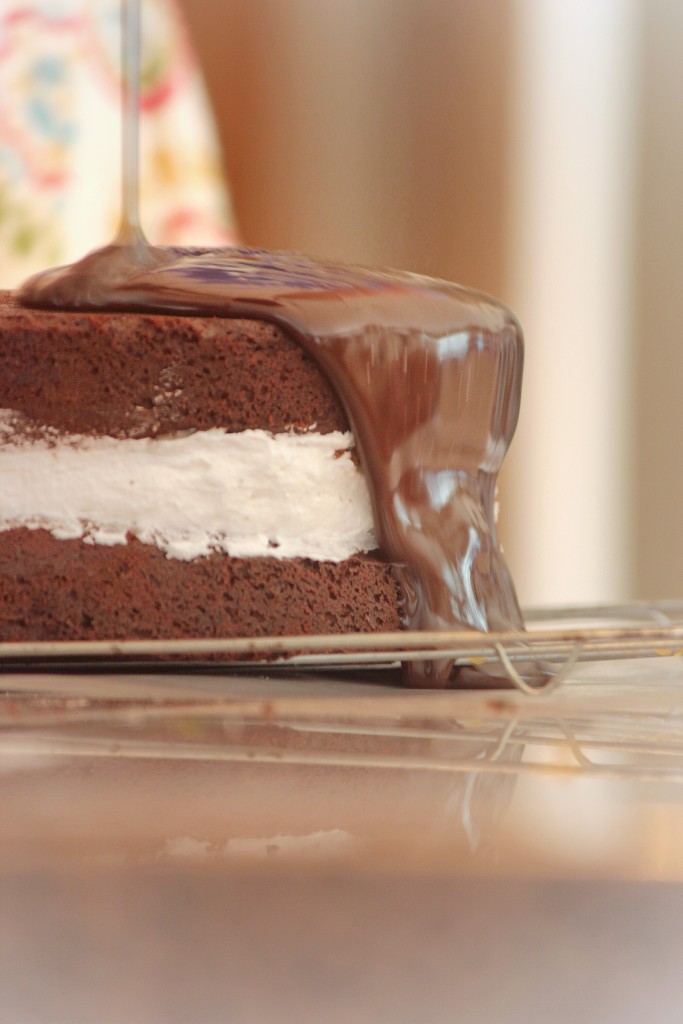
- You can now prepare your chocolate ganache by melting your chocolate over low heat, stirring frequently to avoid the chocolate burning. Once the chocolate is melted, slowly whisk in the heavy cream to create a thin, silky chocolate ganache. Let the ganache cool about 5 minutes before pouring on the cake.
- Before you start pouring the ganache on the cake, place a piece of wax paper under the wire rack that your cake is sitting on. Pour the ganache over the cake, spreading it over the top, and then letting it drip over the sides. As it drips over the sides, take a spatula to push the ganache against the cake and spread the chocolate around the sides. The extra will drip onto the wax paper, which you can scoop up with the spatula and continue to spread on the sides of the cake until it's completely covered.
- Take the last 1/3 of salted caramel and drizzle it over the top (at this point, you may have to heat it again to make it drizzle'able).
- Store cake in an airtight container. If not serving immediately, store in the refrigerator for up to 3 days. Let come to room temperature before serving.